
The palatal expander “expands” (or widens) your upper jaw by putting gentle pressure on your upper molars each time an adjustment is made. In our practice, we use the mini expander because it is more comfortable yet just as effective as the larger one.
The ideal time to expand the palate is between the ages of seven to eight, when the palatal suture has not begun to fuse. Usually, once puberty hits, the suture starts to fuse. Expanding the palate can resolve crowding and correct a skeletal crossbite (narrow upper jaw), as well as aid in the advancement of the upper jaw with reverse-pull headgear to correct underbites.
Sinus and Airway
Did you know that orthodontic treatment can help manage airway development in growing children? Airway obstruction can lead to a variety of issues, such as mouth breathing, abnormal dental development, malocclusion, and sleep apnea to name a few.
Causes of Airway Obstruction
- Small / high / narrow palate
- Small / short / retruded lower jaw
- Class II malocclusion / over-jet
Chronic Mouth Breathing
Chronic mouth breathing can lead to a variety of bite problems, such as open bite, over-jet, crowding, Class II malocclusion, and crossbite.
Early Treatment
We can help to screen children for signs of mouth breathing, malocclusions, and other airway obstruction conditions such as sleep apnea. With early intervention, our team is able to detect and help prevent growth abnormalities which can lead to future breathing problems and bite problems.
Orthodontic appliances such as a palatal expander can be used to help widen upper teeth, and this has been shown to help improve the airway in children.
Adjusting the palatal expander
The animation below will instruct you about when and how to adjust your expander. When you achieve the desired expansion, you will wear the appliance for several months to solidify the expansion and to prevent regression.
Adjusting the palatal expander
You can also download these instructions in a printable PDF document.
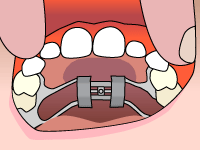
Step 1
In a well-lit area, tip the patient’s head back.
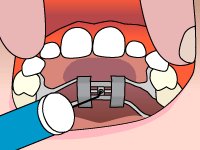
Step 2
Place the key in the hole until it is firmly in place.
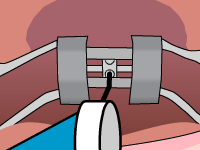
Step 3
When you push the key toward the back of the mouth, you will notice the fender will rotate and the new hole will appear. The rotation stops when the key meets the back of the expander.
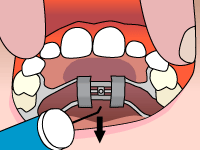
Step 4
By pushing back and down toward the tongue, remove the key. The next hole for insertion of the key should now be visible.